
Select the figure from among the given options that can logically replace the question mark (?) in the following series.



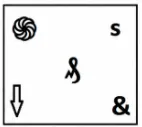
The correct option is:
Step-by-Step Explanation:
To find the next figure in the series, let's analyze the positions of the five distinct symbols in the grid:
1. Down Arrow (⇩)
2. Pinwheel / Spiral (🌀)
3. Ampersand (&)
4. Lowercase 's' (s)
5. Musical Clef Symbol (𝄞)
Each figure has five key positions: Top-Left (TL), Top-Right (TR), Center (C), Bottom-Left (BL), and Bottom-Right (BR).
Let us observe the movement of these symbols from one frame to the next:
1. Movement from Frame 1 to Frame 2:
• The symbol at Bottom-Left (BL) (&) moves to Top-Left (TL).
• The symbol at Bottom-Right (BR) (s) moves to Bottom-Left (BL).
• The symbol at Top-Right (TR) (Clef) moves to Bottom-Right (BR).
• The symbol at Top-Left (TL) (Down Arrow) moves to the Center (C).
• The symbol at the Center (C) (Pinwheel) moves to Top-Right (TR).
2. Movement from Frame 2 to Frame 3:
• BL to TL: The letter 's' moves from BL to TL.
• BR to BL: The Clef moves from BR to BL.
• TR to BR: The Pinwheel moves from TR to BR.
• TL to C: The Ampersand (&) moves from TL to C.
• C to TR: The Down Arrow moves from C to TR.
This confirms that the movement pattern is identical and consistent throughout the series.
3. Applying the movement pattern to Frame 4 to obtain Frame 5 (the answer):
In Frame 4, the layout of the symbols is:
• Top-Left (TL): Musical Clef
• Top-Right (TR): Ampersand (&)
• Center (C): Lowercase 's'
• Bottom-Left (BL): Pinwheel
• Bottom-Right (BR): Down Arrow
Applying our established movement rules:
• The Pinwheel at BL moves to TL.
• The Down Arrow at BR moves to BL.
• The Ampersand (&) at TR moves to BR.
• The Musical Clef at TL moves to the Center (C).
• The lowercase 's' at the Center (C) moves to TR.
Thus, the final figure (Frame 5) must have:
• Top-Left: Pinwheel
• Top-Right: Lowercase 's'
• Center: Musical Clef
• Bottom-Left: Down Arrow
• Bottom-Right: Ampersand (&)
This matches the figure shown in the correct option.